
amazing spiderman
创建“惊人的蜘蛛侠”桌面
原文来自:http://www.adobetutorialz.com/articles/3061/1/The-amazing-spiderman
作者: adobetutorialz
翻译: cwws
Decorate your desktop with this amazing spiderman wallpaper concept.
这个教学将告诉你如何创建一张蜘蛛侠的墙纸来装饰你的桌面。
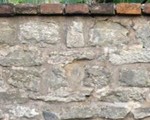
Start working by finding a kind of carpet texture having 1280×1024 px and 72 dpi, the one from below (I used this texture from cgtextures.com):
首先找到一张1280×1024像素,72 Dpi的地毯图案,如下图这张,(我是从cgtextures.com网站找到这张图片的。)
Next we’ll create a new file (File>New) of 88×102 px and 72 dpi to represent the first part of the texture we want to have, using the Pen Tool (P)
接下来我要新建一个文件(选择File>New),尺寸为88×102像素,72 dpi,使用钢笔工具来画我们想要的第一个形状。
Select the next demonstrated parameters for the last made layer by making a mouse click on this layer on the layers’ panel: Fill 0%, Blending Options>Stroke
选择我们的层双击层,选择Blending Options>Stroke (描边图层式样),并在layers面板将Fill(填充值)设置为0%。
Create one more new layer of 112×97 px and 72 dpi and place here, applying the Free Transform option, the texture’s elements. We’ve preliminary made a copy of the texture:
再新建一个112×97像素 和 72 dpi的图像,将六角形描边图形放进去,使用自由变换工具,并复制它们,摆到如下图所示的位置。
Edit>Define Pattern
On the new layer (Create new layer) we’ll select Edit>Fill option where we’ll apply the earlier saved texture’s pattern:
选择Edit>Define Pattern (定义图案),将上一步创建的无缝平铺蜂巢定义为Photoshop的图案。
在地毯图片上新建一层,选择Edit>Fill(填充)功能,然后选择我们事先定义好的图案来填充整个画面。
The texture’s layer will be processed now with switch between Free Transform and Warp modes out of the Free Transform selection:
使用自由变换工具和Warp(扭曲模式)来将蜂巢层处理成下图的样子。
Select for the changed layer the next selection: Filter>Blur>Gaussian blur
选择该层,赋予Filter>Blur>Gaussian blur (高斯模糊滤镜)
Next we’ll create a new layer under the previous one and apply the earlier represented texture’s pattern Edit>Fill. Using the Free Transform option, make smaller the texture’s sizes:
接下来我们在前面模糊地层下面再新建一层,点击Edit>Fill再次填充之前定义的图案,使用自由变换工具,使纹理尺寸更小些。
The layer’s parameters: Blending Options>Drop Shadow
给该层使用Blending Options>Drop Shadow (投影)图层式样
Blending Options>Gradient Overlay
再给它Options>Gradient Overlay (渐变覆盖)图层式样
Gradient’s parameters:
渐变的选项如下图所示:
Make a click on the bottom part of the layers’ palette on the layer we work with on Add a Mask selection and choose here a standard brush (Brush Tool (B)) to clean out with black color several texture’s zones:
在层面板底部点击快速遮罩按钮,给这个层添加一个Mask,然后选择(Brush Tool (B)) 画笔工具,选择一个标准的笔刷,将前景色设置为黑色,在Mask上绘画去掉一切纹理区域。
Next we’ll represent the web, using this time the Rectangle Tool (U) to draw a rectangle of yellow color. Then press Alt button while using the Pen Tool (P) and the Convert Point Tool to cut out an opening in the web, representing this way its image:
然后我们要制作蜘蛛网,这次使用Rectangle Tool (U)矩形矢量工具来画一个黄色矩形,然后使用Pen Tool (P)钢笔工具和Convert Point Tool转换点工具来切出一个个蜘蛛网的开口,如下图所示的形状。
The layer’s parameters: Blending Options>Drop Shadow
给这个层使用Blending Options>Drop Shadow (投影图层式样)
Blending Options>Inner Shadow
再应用Blending Options>Inner Shadow (内阴影图层式样)
Blending Options>Outer Glow
第三个是Blending Options>Outer Glow (外部辉光图层式样)
Blending Options>Inner Glow
再是Blending Options>Inner Glow (内部辉光图层式样)
Blending Options>Bevel and Emboss
最后是Blending Options>Bevel and Emboss (导角与浮雕图层式样)
Make a copy of the last made layer and choose for the copy different parameters, the ones you may see below:
Fill 0%, Blending Options>Bevel and Emboss
复制一层蛛网层,并给蛛网层应用不同的参数,如你下图所见:
将Fill(填充)设置为0%,并修改Blending Options>Bevel and Emboss图层式样的参数。
Next we have to combine in a group all the layers composing the both web layers (press Ctrl button to mark out the corresponding layers and then hold on the left mouse’s button when moving the marked layers on Create a new group selection). Make a copy of the last represented group; choose Free Transform option to turn around the copy, placing it the same way from below:
现在我们要将组成蛛网的两层放在一个Group文件夹中,(按住Ctrl键选择相关层并按住鼠标左键向下拖到层面板的文件夹按钮,再将制作好的Group组复制一个,给复制的Group组应用Free Transform (自由变换)功能,镜像翻转它,放到如下图所示的位置:
On the next new layer (Create new layer) we’ll select the standard brush and paint out the dividing zone between the web’s halves. The color is # E9ECC
新建一层,我们选择标准的笔刷工具,使用 # E9ECC的颜色将两边蛛网之间的缝隙填充掉。
Next we’ll represent the spider, using the Pen Tool (P) and the Convert Point Tool and the color #929292 for the layer.
接下来我们要制作蜘蛛标志,使用Pen Tool (P)钢笔工具和onvert Point Tool 点转换工具,使用颜色#929292画出蜘蛛的形状。
The layer’s parameters: Blending Options>Satin
要给这个层应用的图层式样如下:Blending Options>Satin
Blending Options>Stroke
再加上Blending Options>Stroke (描边)图层式样
Gradient’s parameters:
描边渐变色的参数如下图所示:
Next we’ll rasterize the spider’s layer. In this case we’ll represent a new layer (Create new layer) above the spider’s layer and press Ctrl button to mark out both layers and then press CTRL+E. Using the Paint Bucket Tool (G), fill the rasterized layer with black color. Applying the Free Transform option, it’s possible to displace a little the layer down. This last made layer needs to be placed lower than the previous one on the layers’ palette.
然后我们要将蜘蛛层栅格化,首先复制一层蜘蛛层,然后我们在蜘蛛层上面新建一层,然后按住Ctrl键选择这两个层,然后按CTRL+E合并这两个层,选择合并层上蜘蛛选区,使用Paint Bucket Tool (G)(油漆桶)工具,用黑色填充栅格化的图层,再应用Free Transform自由变换工具,让整个层往下一点,最后我们要让这一层放的位置比它上面的蛛网层低。
The layer’s parameters: Blending Options>Drop Shadow
给这一层的图层式样包括: Blending Options>Drop Shadow (投影)
Create a new layer that must be painted in #75899F color. Choose for this layer the selection Filter>Render>Clouds
新建一层,用#75899F 颜色填充,然后给该层赋予Filter>Render>Clouds (云层)滤镜。
Using the Dodge Tool (O), try to make lighter the zone containing the clouds’ texture.
使用Dodge Tool (O)工具,尝试让云层纹理层的亮部变得更亮。
Press Alt button while clicking between the layers containing the clouds’ texture and the spider’s layers on the layers’ palette.
按住Alt键点击云层纹理层和蜘蛛层之间的区域,让云层纹理只作用于蜘蛛的形状。
The next new layer we’ll process with the Paint Bucket tool (G) and the color #a9c3d
再新建一层,让我们用Paint Bucket tool (G)油漆桶工具和#a9c3d 的颜色填充。
Choose the parameters from below for the last made layer: Blending mode-Color
将新建层的层叠模式改变为Color ,使它对下面所有的层染色。
Make a click on the bottom part of the layers’ panel on the same layer on Add a Mask selection and select for it a standard brush (Brush Tool (B)) of black color to clean out the right half of the picture:
点击层面板底部的快速Mask按钮,添加一个Mask,并用(Brush Tool (B))标准画笔工具,选择黑色,来清除画面的右半边。
Next we’ll represent one more new layer (Create new layer) where must be chosen the earlier mentioned standard brush of black color to dark out the picture’s edges:
下面我们还要新建一层,,并用笔刷工具将四周边缘变黑,制造中心的焦点。
Finished!
完成了!










0回复创建“惊人的蜘蛛侠”桌面"