
翻译 Zivix(ABOUTCG)
Introduction
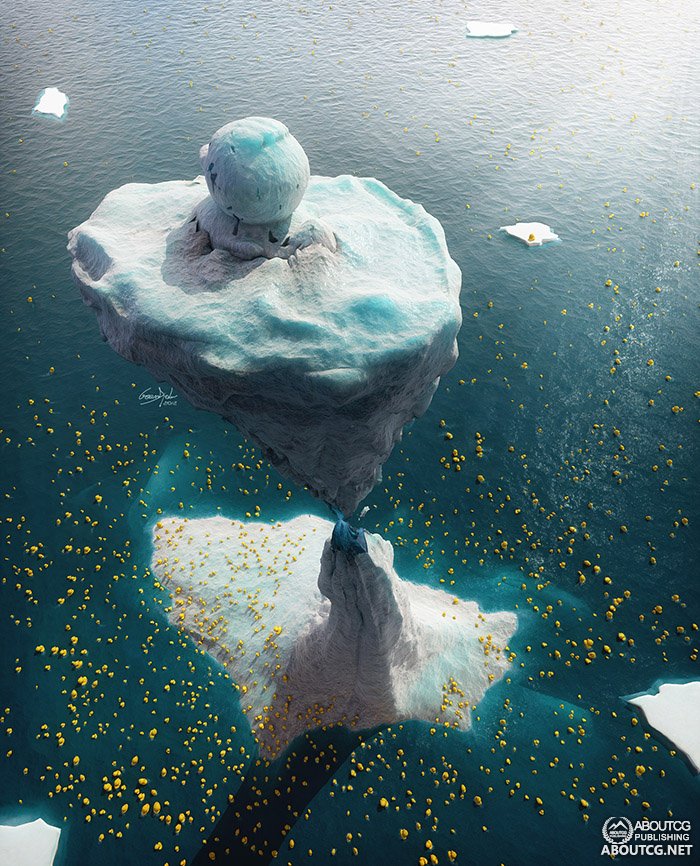
Most of the time when creating a new illustration, I have no idea what direction to take. Initially, this scene consisted of a close-up of plastic ducks in a bathtub, sucked into a maelstrom. Sadly the exercise soon proved difficult and almost impossible due to a lack of hardware performance, but the idea of creating a bit of an extravagant scene with my little ducks was still in my mind. So I headed towards something bigger and wider, where I could use closeness and detail on the one hand, and depth on the other. What is more extensive for my ducks than the ocean!
很多时候,当我打算做一个新作品的时候,我并没有明确的方向,起初,我打算制作一个浴缸鸭子被卷入漩涡之中,但事后后来发现这样难度有点大,但是我依然不释怀我的小鸭子们.所以我的眼光伸向更广阔的东西,有什么能比大海更广阔呢?
Modeling
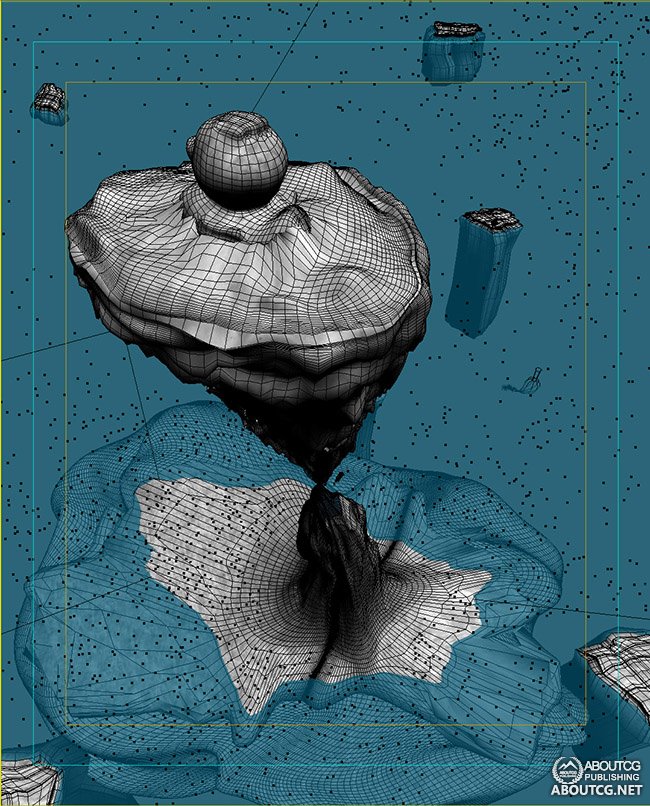
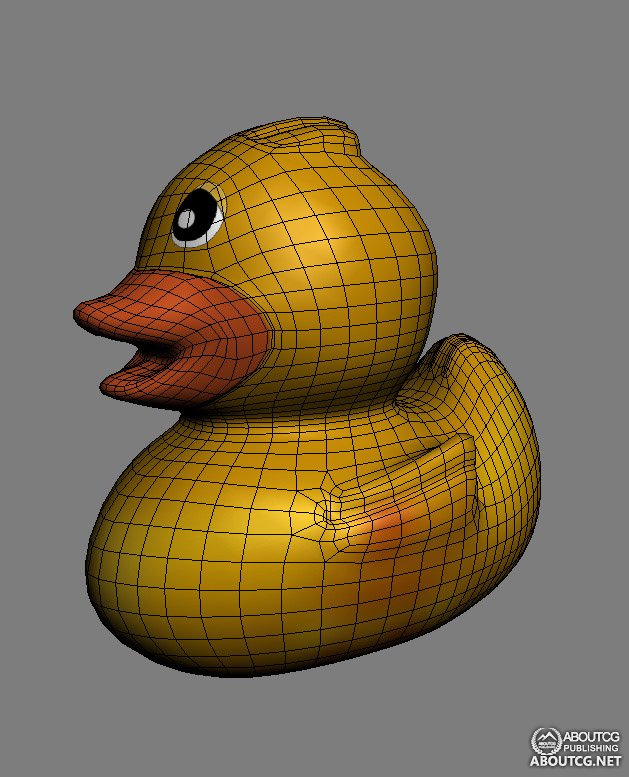
Often in my 3D designs, the modeling is quite simple and basic; however I do not skimp on the reference images, in order to remain consistent. I used a hemisphere for the environment and a plan for the water. For the icebergs and ducks, it was purely box modeling. So, with edit poly, I moved the vertices and added segments (Fig 01 – 02). As I said, it was very basic!
在我的作品中,建模是很基本和简单的,我也很实用很多参考图,我使用一个半球来制作环境效果,还有制作鸭子和冰山,这些都是非常基本的操作.
Fig.01
Fig.02
Still, note that I used the Paint Deformation tool for the main iceberg, to add more detail where I considered it to be important. This tool is a good alternative to the 3ds Max Noise Modifier tool, because it makes it easier to add depth and relief in a less random way. Be careful not to abuse it though, at the risk of littering the model. You’d be better off using an Edit Poly modifier and adding TurboSmooth to add vertices, rather than working at the “base” of the model.
值得注意的时候,我是用了绘制变形工具,用来增加冰山的细节,这个工具类似于噪波修改器,但是更容易得到随机的变化和深度,但是注意别用的过头了,你最好先给模型上加一个涡轮平滑和poly修改器以后在使用这个工具.
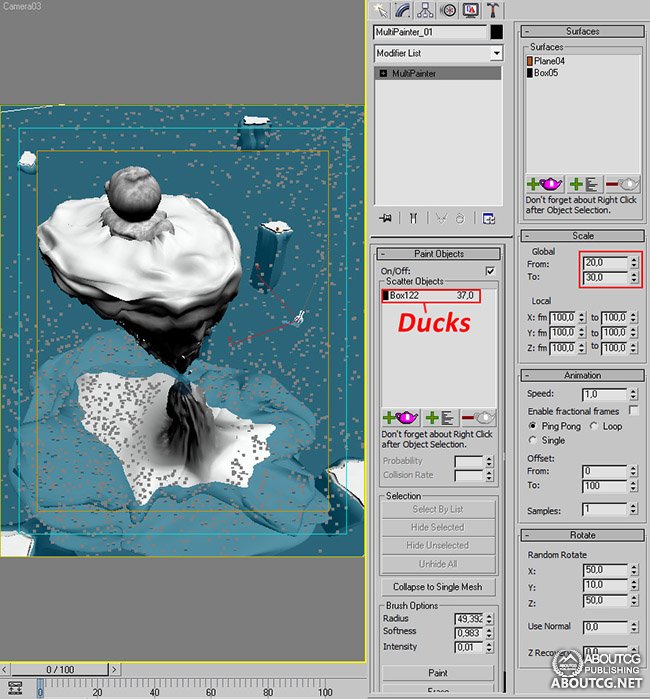
Finally I used the wonderful MultiPainter tool. The Scatter Object is the duck model converted to a VRayProxy and the surfaces are the water, of course, and the main iceberg (Fig.03).
最后我是用了MultiPainter工具,鸭子的模型会被转化成vray代理物体,冰山也是.
Fig. 03
Texture
I always enjoy spending time on this step. At this point I used V-Ray materials, which are easily configurable and very intuitive. Then I roughly put in the main light sources, to visualize the reactions of the different materials better.
我总是非常喜欢这一步,配合使用vray材质调节,非常的直观,然后设置主光源,便于更好的测试材质.
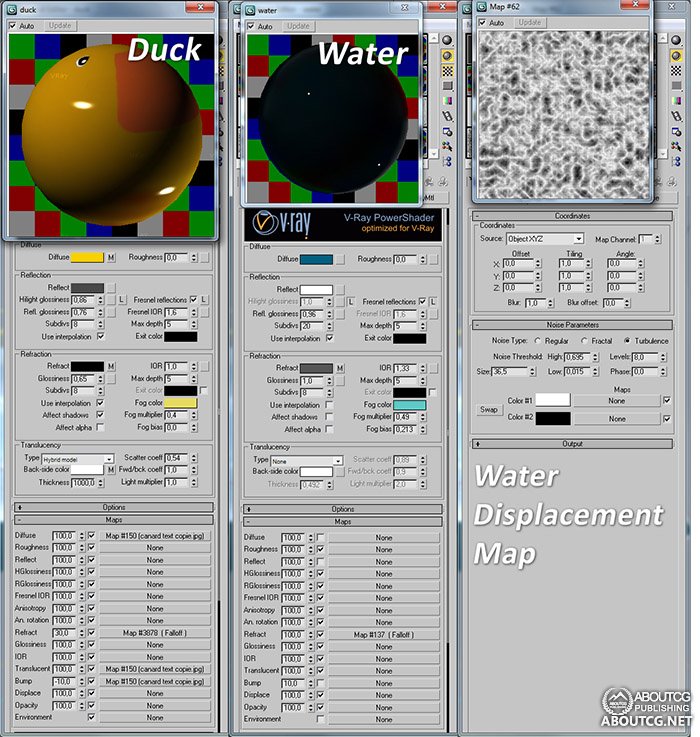
For water, the tricky part here was the refraction. Many test renders were conducted to get the desired result (a beautiful semi-transparent turquoise). So I played a lot with the intensity of the Refraction, the Fog color and Fog multiplier. Initially, to reduce the rendering time, a Noise map was placed in the bump slot, but the lack of detail quickly led to my decision to use a nice Displacement map on a VRayDisplacementMod. The detail level here was controlled with the Levels parameter of the map.
对于水,最棘手的就是折射,我做了很多测试,希望能得到期望的效果(一种美丽的半透明松绿石)所以我调整了很多折射和fog参数,最初我是用了噪波贴图,但是最后我使用了置换.
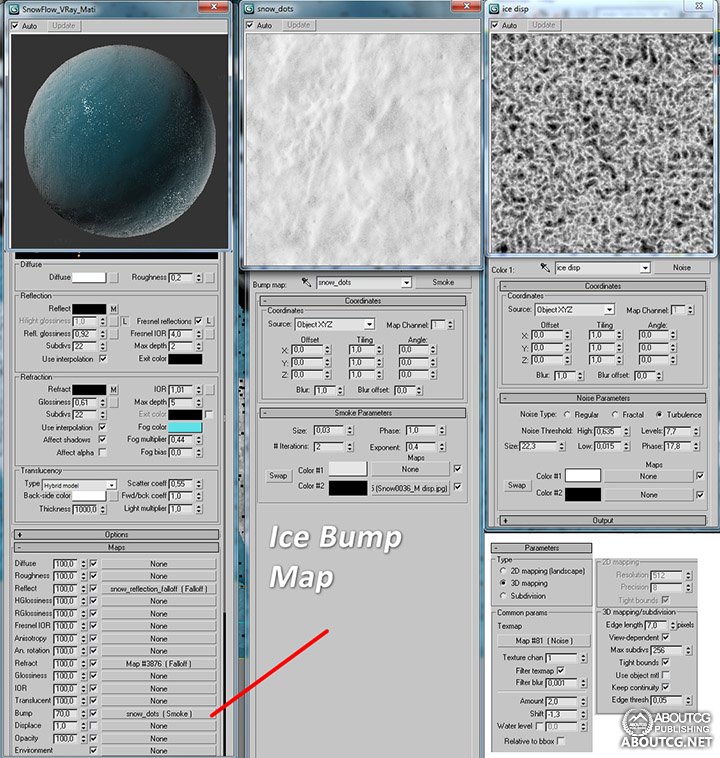
For the ice I tried a lot of different configurations with the Displacement map, which consumed a lot of rendering time. The blue/green color was generated by the refraction and translucency.
对于冰,我测试了不少配置和置换,花费了大量的时间,蓝色绿色的折射了半透明效果.
In the end, the only painted texture was the one for ducks! This was also the only object with the hemisphere, created for an environment that required UVW mapping (Fig.04 – 05).
最后鸭子使用了半球形的UV映射.
Fig. 04
Fig. 05
Lighting and Rendering
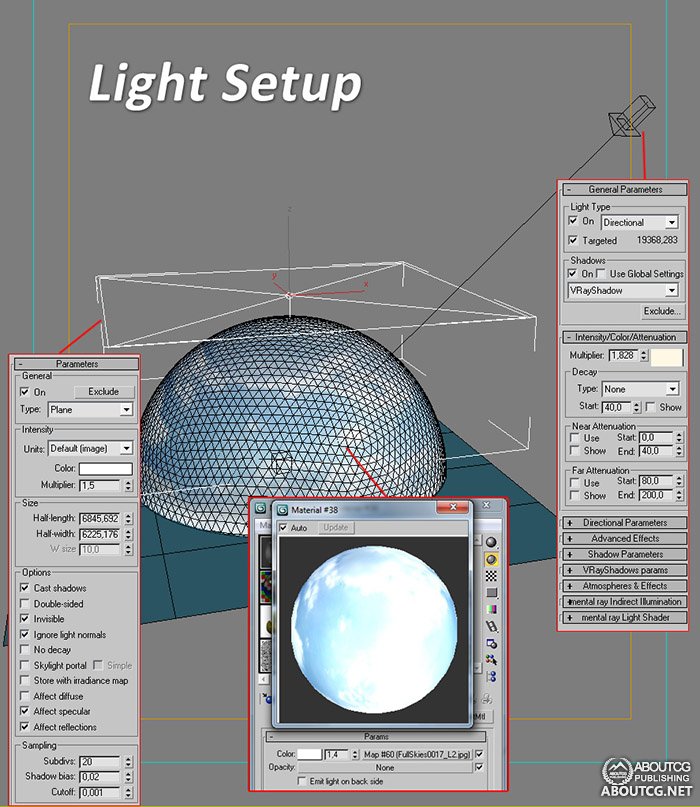
The principal light source is a direct light, which simulates sunlight. I could have used a VRaySun, but I find that simple light is easier to use and without a VRaySky it is almost pointless. My sky here is the hemisphere with a VRayLightMtl and a sky texture from www.cgtextures.com. It is a good technique to create outdoor scenes and is also quite fast. Finally, I added a large VRayLight at the top of the scene to add more reflection and specularity (Fig.06).
主光源是一个直射光灯,用来模拟阳光,虽然我可以实用Vraysun,但是我发现,简单的灯光更容易控制,我的天空半球纹理来自www.cgtextures.com.这是一个创建户外场景的好办法,也很迅速,最后我还添加了一个打的Vraylight,在顶上,用来模拟更多的反射效果.
Fig. 06
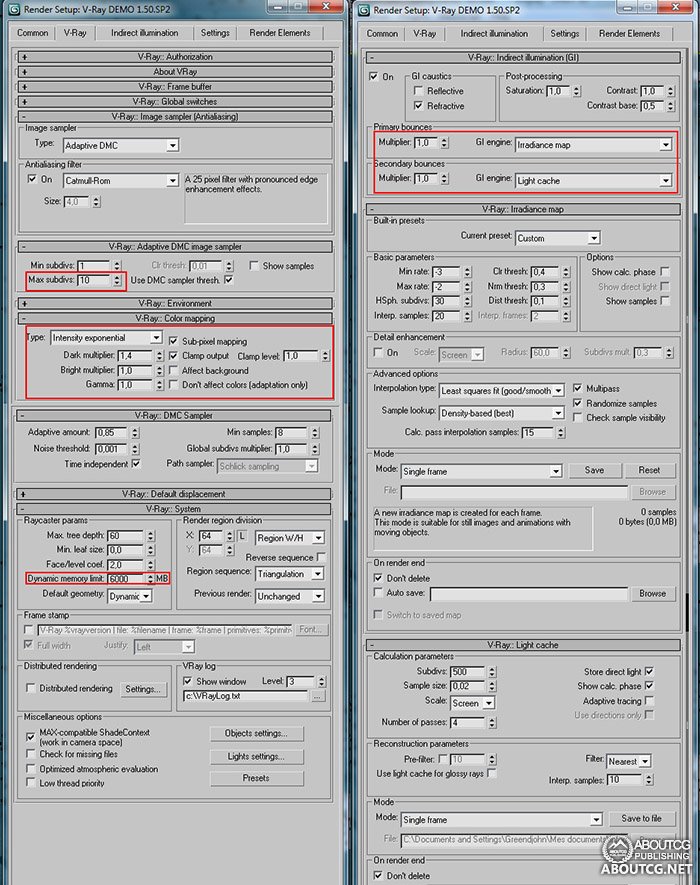
I faced some troubles with the rendering. I used Light Cache and an Irradiance map with medium settings. The Max Subdivs parameter was used to control the noise level on the final render.Due to the pervasive Displacement maps, I had to increase the memory limit (Fig.07).
渲染的时候遇到了一些麻烦,我是用的是Light Cache和Irradiance map,的中等精度设置,Subdivs设置来控制噪波,因为置换贴图的原因,我不得不调高内存限制.
Fig. 07
At the end, with my Core i7 and these settings, the render (2000 pixels width resolution only) took about 10 hours. At least I had no bad surprises!
最后我的core i7 ,渲染2000像素的图,花了10小时,最好的效果还不错!
Post-production
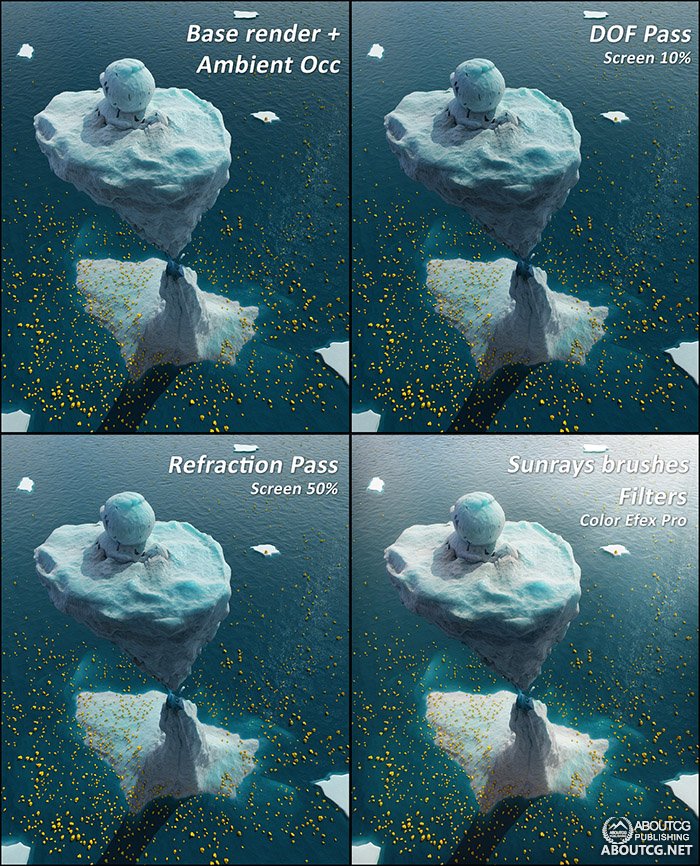
This step was quite quick. As always, I rendered out Occlusion and Depth of Field passes. I also made some corrections with the Refraction pass, and used Photoshop’s Burn/Dodge tool to increase the light and dark areas (Fig.08).
这一步非常快,和往常一样,我渲染了AO和景深,我也做了一些修正反射和折射的通道,使用PS的增亮工具来增加光和黑暗的区域.
Fig. 08
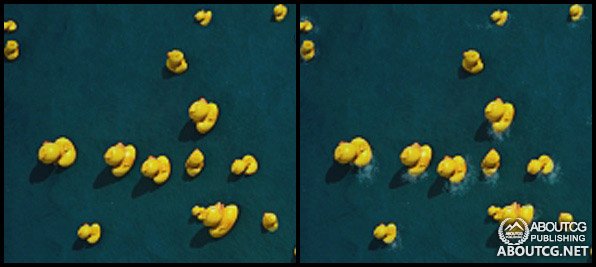
The final (and most annoying) step was to add some foam at the base of the ducks with a small, noisy brush (Fig.09).
最后(也是最烦人的)是增加那些鸭子底部的泡沫,使用噪点笔刷.
Fig. 09
Conclusion
As I said, there is no rational explanation to this picture; it’s just a matter of interpretation. As Edgar Degas said, “Art is not what you see, but what you make others see.” What do you see?
就像我说的,这个作品没有合理的解释,就像埃德加德加说,“艺术不是你所看到的,而是你能别人看到什么。“你看到了什么?







冰山的材质是属于3s材质吗,没用过(vr)
头像怎么弄。。。
Z大赞!
Nice! How can I sign up for RSS to your blog? Thanks!
just see the sidebar, there is a RSS icon.
好棒的作品,又萌又牛!