
Fire and Ice – rendering Diamonds and Gems in mental ray
冰与火 - mental ray渲染钻石与宝石
翻译:menboy2003(ABOUTCG翻译小组)
原文:http://mentalraytips.blogspot.jp/2009/11/fire-and-ice-rendering-diamonds-and.html
They say Diamonds are a Girls Best Friend, but they can be a poor rendering guys worst nightmare.
人们说钻石是女孩们最好的朋友,但是它们也会是渲染初学者最糟糕的噩梦。
One of the reasons is the characteristic property of fine diamonds known in the gem business as “fire” – the nice “pretty colors”.
其中的一个原因是珠宝业里细钻石的特性“火”,也就是良好的色泽。
These stem from the fact that Diamond is a material with very high dispersion. It is also coupled with the fact that the “cut” of a
diamond is specifically made to enhance the “fire” (dispersion) and “brilliance” (ability to reflect light back to the viewer) as much as possible.
这些源于一个事实,钻石是一种有着非常高色散的物质。并且钻石的切割工艺是专门为了加强“火”(色散)和“光辉”(反射光线到观众的能力)。
But even before we get to the actual dispersion part of things, lets try to see what it takes to render realistic gem’s without it first.
在我们得到真实色散之前,让我们先看看渲染无色散的真实宝石需要什么。
Setting up a scene for Gem rendering
设置宝石渲染场景
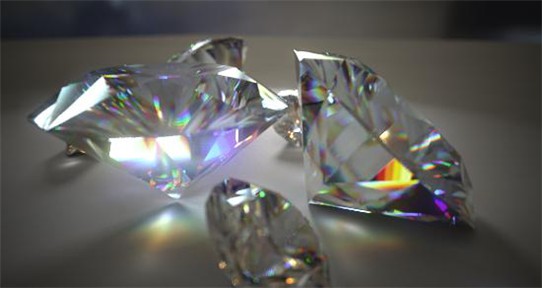
We start with a ridicolously simple 3D model. Since I can’t model worth crap, I downloaded a diamond cut according
to the classic “round brilliant” from here, and made this supercomplex scene:
我们用一个非常简单的3D模型开始。模型制作不阐述,我从这里(http://www.the3dstudio.com/product_details.aspx?id_product=13999)
下载了一个根据“圆明亮型”(http://en.wikipedia.org/wiki/Diamond_cut)切割方法的钻石模型,并且制作了这个场景:
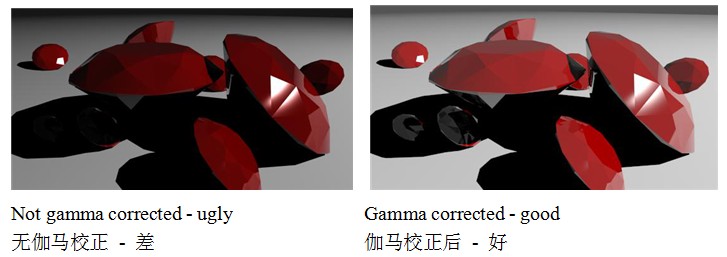
First, make sure you have your gamma correction enabled, diamonds, like all physical things, should be rendered linearily.
首先,确保启用你的伽马校正,钻石和所有物理事物一样,需要线性化渲染。
Now we need some decent lighting. We need to follow physics as much as possible. Especially we want to avoid nonphysical
“hacks” like specular-only lights, lights without shadows, and other things. We really want to light this in the same way a real photographer would light his scene, with realistic lights with all their realistic effects.
现在我们需要一些适当的照明。我们要尽可能遵循物理学原理。特别需要避免非物理的“错误”比如只有反射的灯光,
没有影子的灯光和一些其他的。我们非常希望以一个真实摄影师的方式给场景打光,使用真实的光源和它们真实的效果。
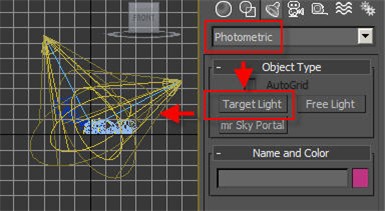
In 3ds Max the easiest way to do this is to use the Photometric lights. This will become especially important later when we get to the caustics,
because the Photometric lights automatically gives us the proper photon energy for free. That is a little bit more work to achieve in Maya or
Softimage (XSI) because you have to set the photon energy up manually.
在3dsMax中,最简便的方法是使用Photometric lights。当我们调整焦散的时候这将尤其重要,因为光度学灯光会自动给我们正确的光子能量。
使用Maya或者Softimage(XSI)会更繁琐一些,因为你需要手动设置光子能量。
A key point here is that we make them Target Lights (i.e. spotlights). This is so we get the most efficient distribution of photons.
If we didn’t give them a direction to shine, our photon emission phase would be much slower because so many photons would
get lost in empty space. Make sure you aim the lights where they are needed – this is especially true with caustics.
这里的要点是,我们使用目标灯(即聚光灯)。这里我们得到光子最有效的分配。如果我们不给它们一个方向发光,我们的光子发射阶段会慢很多,
因为许多光子会丢失在空的地方。确保你灯光的方向对准需要它们的地方——对于焦散来说,这尤其正确。
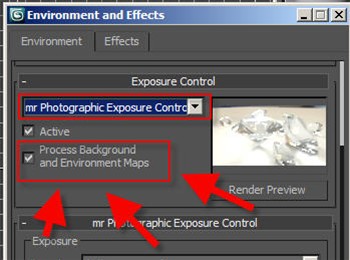
Since we are using photometric lights, this also requires us to use an exposure control. We will be using the mr Photographic
Exposure control, and we need to make sure to check the “Process Environment and Background” checkbox:
因为我们使用的是光度学灯光,这也要求我们使用曝光控制。我们将使用mr Photographic Exposure control,我们需要检查“Process Environment and Background”选框:
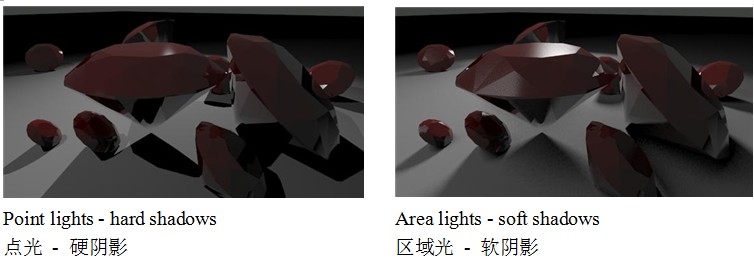
We also want to make sure they are area lights. This gives us the nice soft shadows and “soft” lighting that you would use for
an artsy product render like this:
我们也要确保它们是区域光。这会给我们提供良好的软阴影并且“软化”灯光,你可以使用它做如下的艺术渲染:
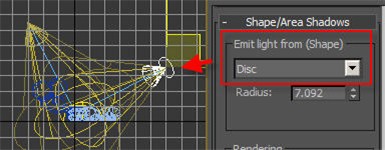
So we enable area lights:
我们开启区域光:
Now these two arealights are not enough, we need indirect light, and to light the scene from the environment as well.
To do this we need turn on Final Gathering.
现在这两个区域光还不够,我们需要间接光,并且需要用环境打亮场景。为了做到这一点,我们需要打开Final Gathering。
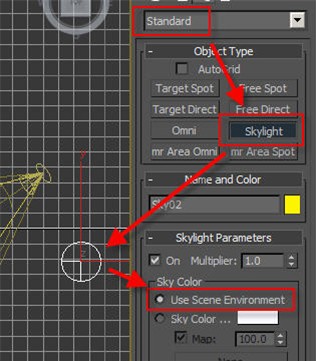
In Maya and Softimage, the very act of doing this will implicitly light the scene from the environment. This doesn’t happen in
3ds Max unless we put in a “Skylight”. So we add one of those to the scene, and very importantly, set it’s option to “Use Scene Environment”.
在Maya和Softimage,这样做将会暗中使用环境打亮场景。在3ds Max我们需要打开“Skylight”。所以我们添加一个到场景,非常重要的是,将它的选项设置为“Use Scene Environment”。
Now we have a little more light:
现在我们有了一些灯光:
We are using a default Arch&Design (mia_material) on the gems.
Let us make it more gem-like by a) turning our diffuse to 0.0,
and b) turning our transpacenty to 1.0:
我们使用默认的 Arch&Design(mia_material材质) 作为宝石材质。
让我们使它看起来更像宝石 a:调节diffuse为0.0,b:调节transparency为1.0:
The automatic energy conservation of Arch&Design (mia_material) already makes this a decent looking transparent looking thing…
transparency is complete, but still “overridden” by reflections, and the reflections do depend on angle, just like on real dielectric
materials. However, by default it is not basing it on the index of refraction, but a custom curve. We need to fix that by setting it to IOR mode!
自动调节的Arch&Design已经使这个透明看起来很合适。透明度完成,但仍被反射“覆盖”,并且反射取决于角度,就像真正的绝缘材料。
然而,默认情况下它并不依据其折射率,而是一个自定义曲线。我们需要通过设置为IOR模式来解决这个问题!
This makes our transparency a bit “clearer”:
这让我们的透明更“清澈”:
The scene is still looking rather dull with the gray background. Diamonds (like metals) are not so interesting looking in-and-of themselves,
but area all about reflections and very very bright “pings” of light. Some people may be tempted to cheat this with a bunch of specular
only lights, but why cheat when there is a real reason for such effect – reflections of Bright Things.
这个灰色背景的场景看起来还是相当沉闷。钻石(像金属一样的:http://mentalraytips.blogspot.com/2007/10/making-better-metal-with-miamaterial.html)本身并不好看,
但是所有反射和明亮的区域就很好看。有些人可能试图用一束只有反射的灯光来欺骗达成,但当知道了产生这种效果的真实原因(对明亮事物的反射)之后为什么还要欺骗呢。
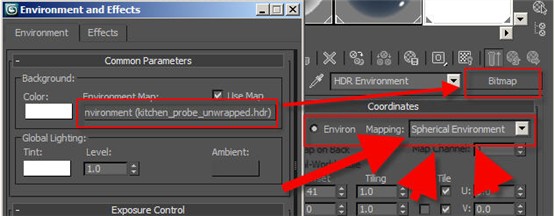
And what’s the easiest way to get some Bright Things, if not an HDR environment map? Lets slap in some interesting HDR environment map.
In 3ds Max you do this by adding a Bitmap to your Environment slot, and make sure to set it to a spherical environment:
(Note: When doing this you may need to play with the Physical Scale to avoid having the environment map render dark, see here)
不使用HDR环境贴图的得到明亮事物最简便的方式是什么呢?让我们拿一些有趣的HDR环境贴图。在3ds Max中通过添加位图到你的环境槽来实现
,并且确保将其设置为spherical environment(球面环境):(注意:当你这么做的时候你也许应该调整Physical Scale来避免环境贴图渲染很黑,详情看这里:
http://mentalraytips.blogspot.com/2008/02/why-does-mental-ray-render-my.html)
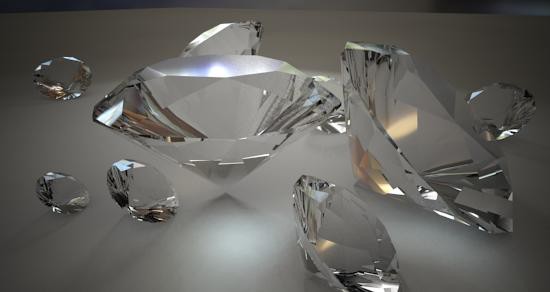
This should give us something much more interesting to look at. And note how the background lighting changed in tone to match the environment?
This is because Final Gathering is picking up the new environment and getting it’s lighting from there:
这会让我们的场景看起来更有趣。注意背景照明色调的改变是如何匹配环境的?这是因为Final Gathering拾取了新的环境并且从中得到了灯光:
Actually FG is even picking up some of the concentrated bright spots and creating a form of “faux caustics”.
We will get to real caustics later, but for now it is looking pretty.
实际上Final Gathering会拾取一些集中明亮的区域并且制造一种“人工焦散”。我们之后会得到真实焦散,但是目前为止,它看起来还不错。
To make our image look nice, we are using the mr Photographic Exposure control. To make it even nicer we are going to do some modifications.
为了使我们的图像看起来不错,我们使用mr Photographic Exposure control。我们将进行一些修正让它更好。
First, images like this, where we want to focus on some nice center object, always benefit from a bit of vignetting (darkening of edges):
首先,像这幅图,我们要突出一些不错的中心对象,总是通过一点晕影来呈现(暗角):
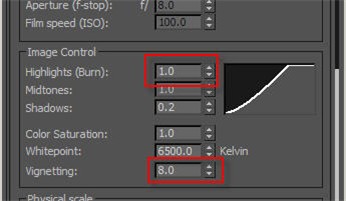
Secondly, since these are diamond renders, and we truly want strong “pings” of light, we should turn up the highlights,
to make the really bright bits be really really bright:
其次,由于这些是钻石渲染,我们很想要非常亮的光,我们应该提亮高光,使光亮部分很亮很亮:
These are the knobs we used to do this:
这些是我们使用的选项:
And here comes a final little subtlety. This is really hardly a visible change, but I like it. The model is made with absolutely perfectly sharp edges.
And a Jeweller will want to sell you on the idea that his diamond is perfectly flat with totally sharp edges.
最后这有个微妙的地方。这确实是几乎无法观察的改动,但我喜欢。这个模型有绝对完美的锐利边缘。并且珠宝商会以他的钻石完美平整并有锐利边缘为特点来向你推销。
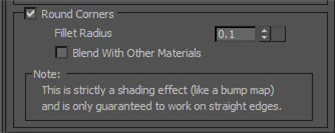
But reality have no such thing as 100% sharp edges, so I love to throw in a teeny bit of edge rounding, which will make edges catch
“glints” and look more realistic. Cue the mental ray render time round corners shader thingy, and you will get…
但现实已经没有所谓的100%锐利边缘,所以我喜欢做一点小的边缘圆角,这使边缘“闪烁”,并且看起来更真实。提示mr有圆角shader(译者注:这个选项卡在材质面板,特殊效果下),你会得到……
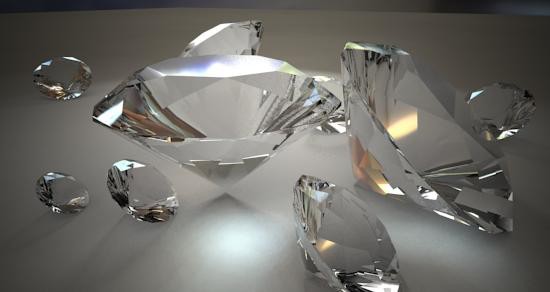
…this. Yeah, not such a big difference, I know. It does more on other shaped Gem’s than the round Brilliant cut, though, so I still suggest you use it.
……这个。没错,我知道没有很大区别。它在其他形状的宝石表现会比圆明亮式切割的更多,不过我还是建议你使用它。
Taking a shortcut
一个简便方法
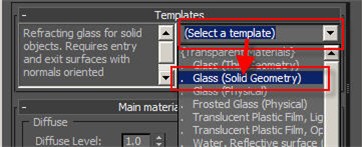
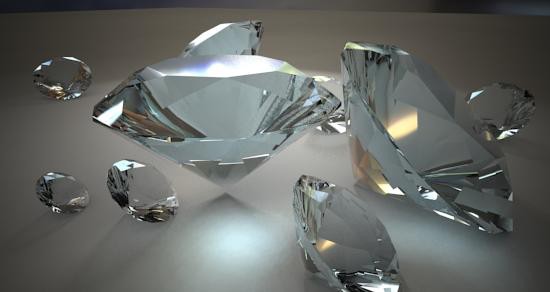
Another way to quickly get to the place we are now with the material, and be certain that all the settings make sense,
is to base it on the Physical Glass preset. All we need to do is to load the preset, and set enable the corner rounding
feature (which is off in this preset), to get a very quick and decent result:
另一种方法快速完成我们现在的材质,确保所有设置合理,是基于Physical Glass预设。我们需要做的就是加载预设,
并设置启用corner rounding(这个在预设里是关闭的),这样得到一个非常快速和适当的效果:
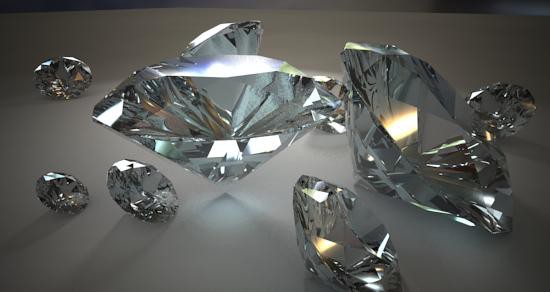
To really make sure we get every single nice “glint” and “ping” of the material, we will disable a speed optimization in
the material intended to skip “unnecessary” reflections on the inside of glass objects, which tend to be very weak.
But we don’t want to loose any light, so we turn that feature off.
要真正确保我们得到一个很棒的闪亮材质,我们将禁用材质速度优化,这是为了跳过在玻璃对象内部“不必要”的反射,
它将减弱很多。但我们不想减弱任何灯光,所以我们把这个功能关闭。
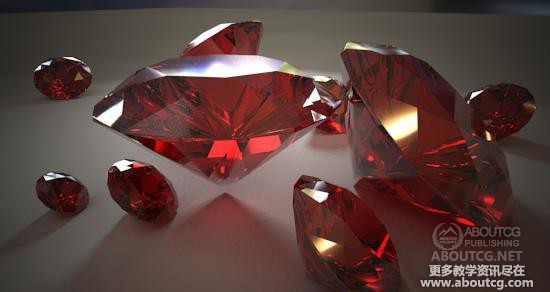
Color Gems
有色宝石
Now these gems look a tad blue. This is because the “Physical Glass” preset introduces some blue.
Before we go further with the diamonds, lets discussed coloring our gems for a moment.
现在这些宝石看起来有点蓝。这是因为“Physical Glass”预设采用了一些蓝色。在我们更进一步调整钻石之前,让我们讨论一下为我们的宝石上色。
The quick and “obvious” way is to reach for the transparency color swatch, and set this to a color.
While this gives something (which can look pretty nice), it is not physically accurate:
快速并“显而易见”的方法是得到透明颜色样本,将其设置为一个颜色。这会给我们一些物理上不精确的东西(但是很漂亮):
This is because it modifies the color of the ray “at the surface” of the object, whereas real colored transparent
object modify the color of the ray gradually as it travels through the medium.
这是因为它改变了在对象“表面”的光线颜色,而真正的彩色透明对象会逐渐改变透过介质的光线颜色。






















好 好
好
我记得张晗老师的BLOG上也有一篇关于钻石渲染的文章
ding